Monday, March 22, 2010

Understanding Spinal Surgery


Although previous articles have covered the basics of intervertebral disc injuries, as well as some other more unusual spinal injuries, I have been told that I have neglected to give a good overview of the more common spinal surgeries. Certainly it would be impossible to cover all the possible surgical procedures one might encounter in a case involving a spinal injury, but I can certainly provide a brief orientation to the surgeries most commonly seen in this type of litigation. These procedures include cervical, thoracic and lumbar surgeries, both anterior and posterior exposures, and everything from laminectomies and discectomies to foraminotomies and fusions.

Of course, as with any surgery, to fully understand what is being done you need a good fundamental grasp of the anatomy. But often I see that understanding each and every structure in the spine or struggling with the long words used in these surgeries is an impediment to a basic understanding of the procedures. I find that, rather than dwelling on
the discs and various intricacies of the vertebrae, it is easier to first understand the simple basics of the spinal cord and nerve roots since the vast majority of these surgeries boils down to stabilizing or relieving pressure on these nerves. Think of the spinal cord as a major highway that runs its entire course within a tunnel. This tunnel is the spinal canal formed by the rings within the various vertebrae that are stacked one below the other from the skull all the way down to the pelvis. Think of the nerve roots as exits from the spinal cord highway that need to emerge from the tunnel of the spinal canal. These nerve roots exit through foramen, or channels, on either side both right and left where every two vertebrae come together. The surgeon’s primary concern is maintaining the flow of traffic through this highway and on these exits, making sure that the spinal cord and nerve roots are not compressed or pinched.

Let’s talk about the four most common types of spinal surgery first. These are laminectomy, discectomy, foraminotomy and fusion. We’ll deal with each separately although there is some crossover and any combination of these might be performed in the same surgery.

• Laminectomy – While the vertebral bodies and discs lie anterior to the spinal cord, the laminae are the flat shields of bone that form the posterior (back) border of the spinal canal. They normally protect the spinal cord from being damaged from direct impact from behind. If the disc protrudes beyond its normal location back into the spinal canal, the spinal cord can become compressed between the protruding disc material and the laminae. A laminectomy, or removal of the laminae, can be performed to decompress the spinal canal and give the spinal cord a bit more room to move around. This may be all that is required to relieve the problem. More often, the laminectomy is performed not so much for decompression, but rather to allow the surgeon to access the deeper structures within the spinal canal, to create a doorway. Variations of the laminectomy are the hemilaminectomy when only the right or left half of the laminae are removed, and the laminotomy in which only a window of bone is removed from the lamina.

• Discectomy – This procedure is simply the removal of all or part of the damaged intervertebral disc either because it is bulging or herniated back into the spinal canal. This can be done from the front (anteriorly) or from behind (posteriorly). The anterior approach is generally preferred in the cervical spine (neck) since it allows the surgeon to access the disc without having to manipulate or go around the spinal cord and therefore avoiding damage to the cord. On the other hand, even though the spinal cord has to be manipulated, a posterior approach is traditional in lumbar (lower back) cases since this approach avoids the issues of the abdominal structures and major vessels that lie anteriorly. But, over the years, anterior approaches in lumbar cases have become more and more common. Today you may be just as likely to encounter an anterior lumbar procedure.

• Foraminotomy – This procedure is simply an enlargement of the neural foramen, the channel through which the nerve roots exit the spinal canal. This passageway may be narrowed due to herniated disc material or by degenerative arthritis that manifests as an overgrowth of bone. Regardless, for one reason or another, if the foramen becomes narrowed it can put pressure on the exiting nerve root. This can lead to severe pain and neurological dysfunction. To relieve this condition the surgeon must access the foramen and scrape it out removing the offending disc or bone material.

• Fusion – Certainly there are more types of spinal fusion techniques than I can count on my fingers and toes combined. It seems that every year there are new hardware and materials being developed and new techniques associated with each. But let’s stick with the basics. If a disc is damaged and must be removed or if the interspace between two or more vertebrae is unstable, a fusion can be performed to make a permanent connection between two or more vertebrae. The eventual goal of any fusion procedure is to actually get the bone of the fused levels to grow together, using the power of the body’s own healing ability to create a strong connection. But this takes time, so a variety of hardware can be employed to temporarily stabilize the fusion site while the bone growth takes place. This hardware may consist of devices placed within the disc space, or plates, screws and rods placed either anteriorly or posteriorly. Due to the variety possible, I will publish future articles dealing with this topic in more detail.

Finally, I will mention a few additional procedures that, although not as common as those described above, may be encountered from time to time in your practice. A corpectomy is the complete or partial removal of a vertebral body. A kyphoplasty is the injection of cement or other synthetic material into a compressed or collapsed vertebral body to restore the proper height and alignment. Intradiscal electrothermal (IDET) therapy is the insertion of a wire or coil into a damaged disc that can be heated to cause the disc material to contract and relieve nerve compression. A disc replacement is the placement of a mechanical device into the disc space to restore stability without the loss of flexibility caused by traditional fusion. Click on any of the links above to see examples of the various procedures discussed in this article.

Monday, February 15, 2010

Shoulder Dystocia: Beyond The Basics


Most of you will have already read my January, 2009 article on the basics of shoulder dystocia and are familiar with the most common type of dystocia, or impediment to the delivery of a baby, where the anterior shoulder of the baby becomes lodged behind the pubic symphysis at the front of the mother’s pelvis. This is called anterior shoulder dystocia and accounts for the vast majority of dystocia cases I see litigated by my clients. If you are familiar with anterior shoulder dystocia, you have a great foundation, but there are other types of dystocia and other topics associated with this issue that I will cover in this article. This will provide you with a more advanced understanding of what you may encounter in future obstetrics malpractice cases.

Unlike anterior dystocia, where the anterior shoulder of the baby becomes lodged, in posterior shoulder dystocia the shoulder of the baby that is closest to the mother’s spine or sacrum is the one that becomes stuck. Generally, this posterior dystocia occurs when the posterior shoulder of the fetus becomes lodged on the protruding sacral promontory, which is the upper lip of the sacrum at the base of the lumbar spine. Also, I have seen one case that involved a mother with an unusually curved coccyx, tailbone, on which the posterior became stuck. Either way, the point is that posterior shoulder dystocia, while rare, is possible, so you should be sure of the facts before you assume your case involves the more common anterior type.

Another issue that arises in many of these shoulder dystocia cases is the actions taken by the healthcare provider that might exacerbate the situation. While attempting to dislodge an infant that is not progressing there are many things that should not be done, but in my experience there are two mistakes most commonly associated with brachial plexus nerve injuries. The first is excessive traction or pulling on the baby’s head, especially traction in which the head is pulled downward away from the lodged shoulder. This traction can be done with the hands, with a vacuum extractor or with forceps, and while some traction is necessary in many births, excessive traction in cases of shoulder dystocia can lead to devastating nerve injury. The second issue is fundal pressure. This is when a nurse or assistant pushes down on the upper part of the mother’s abdomen in an attempt to force the baby out. Once again, in cases where the shoulder is stuck, this force can lead to nerve injury. Force is the issue whether it is pulling force or pushing force. If the shoulder is stuck, it must first be dislodged before labor can progress.

Although downward traction and fundal pressure are maneuvers that should be avoided, there are several acceptable maneuvers that can often release the shoulder of the infant. Of all of these, some so desperate that they include fracturing the collar bone of the fetus, there are three that we so most frequently in these cases. The first is called the McRoberts maneuver. This is simply the elevation of the mother’s legs with the knees forced back toward the abdomen. This flexion of the hips causes a substantial change in the angle of the pelvic outlet that can often allow for more easy passage of the infant. Next, there is suprapubic pressure. In this maneuver, a nurse or assistant presses down on the lower abdomen directly above the mother’s pubic bone providing direct pressure on the baby’s shoulder and hopefully dislodging the dystocia. Finally, there is the Woods corkscrew maneuver. This maneuver involves the insertion of the doctor’s fingers into the vaginal canal just behind the baby’s posterior shoulder. Then, with gentle pressure, the shoulder can be rotated in a corkscrew fashion turning the baby into a more horizontal orientation and releasing the anterior shoulder from behind the pubic symphysis of the mother.

Tuesday, January 12, 2010

Mechanism of Pulmonary Embolism


Looking back on 2009, our records show that, once again, pulmonary embolism ranked as the most common medical malpractice issue litigated by our clients. These cases involve blood clots formed in the veins that break off and travel to the chest, through the heart to become lodged in the lungs causing respiratory distress. The popularity of this topic encourages me to provide my readers with a bit of background information. Although the basic mechanism of a pulmonary embolism is straightforward, there are associated issues and terminology that you should be familiar with before you encounter one of these common cases in your future practice.

First of all, why are pulmonary embolism cases so common? Most likely this is because pulmonary emboli can be secondary conditions resulting from prolonged inactivity such as surgical procedures, bed rest or even lengthy airline travel. Therefore, there are a large number of situations that might put a person at risk for this dangerous complication. Generally litigation revolves around the failure to prevent, diagnose or properly treat these emboli.

To understand the mechanism of a pulmonary embolism, we must first understand the anatomy of the veins. The veins are the system of vessels throughout the body that return blood from the various body regions to the heart. Unlike arteries, the veins do not have high internal pressure to keep the blood moving along but actually require assistance from the muscle contractions involved in normal daily activity. This problem of moving the blood along is most pronounced the further the veins are from the heart, and since gravity also acts against venous flow the flow of blood is slowest in the lower extremities (legs and feet). This slowing of blood flow in the veins is a key component in the mechanism of pulmonary embolism. In situations when the body is immobilized due to surgery, convalescence or prolonged inactivity there are no muscle contractions to assist in speeding blood flow. In these cases, flow can slow to such an extent that the normal clotting factors within the blood begin to react and form blood clots. This is often seen at the site of a valve in the vein where blood can pool within the eddy behind the leaflet of the valve. This clot that remains at the site in which it originally formed is referred to as a thrombus. The formation of these clots is called deep vein thrombosis (DVT).

Once a thrombus is formed within a deep vein, it will continue to grow as additional clotting factors collect and adhere themselves to the original clot. But this thrombus is not completely stable. The real problem lies in the fact that pieces can break off from the thrombus and join in the blood stream to be carried upward toward the heart and lungs. Once a clot joins the blood stream and begins to move, we no longer call it a thrombus. It is now called an embolus. To reach the heart and lung from the legs, the embolus must travel up through the inferior vena cava, a large vein in the posterior abdomen. Eventually the embolus will reach the heart where it will travel through the left atrium and ventricle and be pumped out into the pulmonary arteries that lead to the lungs. This embolus will continue to travel within the pulmonary vasculature, which divides again and again into smaller and smaller arteries within this tree-like network, until the embolus reaches a vessel too small to pass through. At this point the embolus will become lodged forming a dam that will block further blood flow through this artery. This blockage of blood flow and the resulting reduction in lung function is called an embolism.

Generally, the smaller the embolus, the less severe the effects will be since a smaller percentage of lung volume will be affected by the blockage of a smaller pulmonary vessel. But often there are a number of emboli released at once or over time leading to a "shower" of emboli that can cause multiple blockages to one or both lungs. These multiple blockages can be as severe as one larger blockage resulting in a higher percentage of total lung function being lost. The most severe form of embolism is referred to as a saddle embolus. This type of embolus is so large that it cannot pass beyond the bifurcation (division) of the main pulmonary trunk into the left and right main pulmonary arteries and therefore causes a sudden blockage of blood flow into both lungs. This condition can often be almost instantly fatal.

The healthcare provider's first responsibility is prevention of deep vein thrombosis. During prolonged surgery, compression stockings and pneumatic compression devices can be used to increase circulation and prevent the pooling that leads to thrombosis. Medications can also be given to thin the blood and prevent clotting. If prevention of clotting in the legs is unsuccessful, medication or even surgery may be necessary to break up and remove the clots from the deep veins. Also, mechanical filters can be placed within the inferior vena cava beneath the heart to prevent emboli from reaching the lungs.

So, as you can see, these cases are generally rather straightforward. A thrombus forms in the deep veins due to inactivity. Pieces of the thrombus break of and join the bloodstream as emboli. These emboli travel through the inferior vena cava and heart to the lungs. These emboli block blood flow through pulmonary arteries creating an embolism that can lead to respiratory distress and possibly death. Those are the basics, and if you can appreciate the basic mechanism, it should be easy to understand any slight variations that may arise in any unique case.

Thursday, December 10, 2009

Presenting Multiple Injury Cases


A good client called this week to discuss her latest case involving a car v. pedestrian collision. It was a great case with no real issues concerning liability, but the presentation of the medical facts was going to be a challenge since the case involved over a dozen traumatic injuries and over fifty surgical procedures. While consulting in this case, I realized that I had offered the same suggestions many times before in similar cases which inspired me to write up a general overview to assist all of you. When considering presentation options for cases involving multiple injuries, there are two specific areas you need to consider: effectiveness and budget. Due to the massive amount of information that may need to be portrayed, these two factors are often in conflict and need to be balanced.

When I say that you need to consider the effectiveness of your presentation, I am referring to the strategic organization of the information, the educational value of the visuals you select and the dramatic impact of those visuals. If these three factors come together well, you will have a better chance of creating an effective presentation that will help you to achieve your goals. In cases with an overwhelming amount of information, the biggest challenge is usually the strategic organization. You can't show everything at once, so which items should be grouped together and in what sequence should they be displayed?

In general the information can be arranged chronologically, anatomically or strategically. A chronological organization could show all the injuries at one time, all the initial surgeries next and all the secondary surgeries later. An anatomic presentation would organize the information by body region. For example, you might show the head injuries first, the spine injuries next and then show the ankle injuries last. These exhibits might combine post-accident, intra-operative and post-operative information together so that each body region could be covered fully before moving on. A strategic presentation revolves more around the testimony to be given. In a strategic presentation, you might choose to divide the information according to how you will get it admitted or by which information each expert will discuss. Therefore, you will concentrate your efforts on illustrating items of interest to the experts who will appear live at trial or will be deposed on video while leaving off issues which are not supported by the experts you have at your disposal.

Next we must consider the education value of our presentation. If we can't afford to create demonstrative evidence for all the issues, we should at least use the power of illustrations for those that are the most complex or difficult to understand. For example, you might instinctively hope to illustrate the dramatic open fracture of the lower leg including the surgical fixation with multiple plates and screws, but there's also a pulmonary embolism to consider. Although the leg fracture and fixation would be impressive as an illustration, it would probably be easy for a lay audience to understand the issues without demonstrative evidence. On the other hand the formation and consequences of the pulmonary embolism would be exceedingly difficult to describe verbally and would most likely be a better focus for a limited budget. The object is to concentrate your efforts in areas where you need the most assistance in making yourself understood.

Last but not least, in order to insure your presentation is effective, you need to consider the dramatic impact of your demonstrative evidence. Drama can be important for many reasons from holding the attention of your audience and making your presentation memorable, to increasing sympathy for your client and increasing the amount of your award. For many, dramatic impact is the most important factor when gauging effectiveness, outweighing the other issues of educational value and strategic organization. Basically, in any multiple injury case, some issues, injuries and surgeries are just going to be more dramatic than others. No matter how important this aspect of effectiveness is to you personally, it is certainly something that needs to be considered when making the decision as to how to allocate resources.

And that leads us to the consideration of your budget. Thankfully, we have already covered almost all the aspects of this consideration while discussing the issues involved in the effectiveness of your presentation. All considerations must be weighed against the others when the information available is too voluminous to be covered comprehensively. Your budget will only set a guidepost for how severely you must sacrifice some considerations when weighting your presentation toward another. For example, if your budget only allows for one topic to be covered by your demonstrative evidence, you may need to select the exhibit that would be the most educational, or that would be the most dramatic or that would specifically support the testimony of the one expert who will be testifying live, but you may not be able to full achieve all three. With a larger budget, you will need to cut fewer corners but decisions will still need to be made.

My opinion is that the best decision is an informed and purposeful decision. You may have made these decisions many times although you may not have been consciously aware of the options you were considering. Hopefully, now that we have discussed the various considerations in detail, you can more purposefully weigh the various options you have and make decisions with which you can fell confident. Of course, I'm always available to discuss options with you, if you feel you need additional assistance.

Friday, November 6, 2009

Advanced Spinal Injury Concepts


Frequent readers of my blogs and articles will have read entries concerning disc bulges and herniations and also covering discogenic pain. Those topics concerning the intervertebral discs, along with various traumatic fractures of the spine, make up the vast majority of the spinal injuries involved in litigation. For that reason, most trial attorneys have at least a passing familiarity with these concepts. But there are other issues involving the spine that may be encountered from time to time. These include spondylolisthesis, spondylolysis, spondylosis and ankylosis, and involve different areas of anatomy including the pars interarticularis and the facets. Since these terms are more unusual, fewer attorneys are familiar with these concepts, so today I will provide you with a general overview so that you may be more comfortable when encountering these conditions in future cases.

First, let us begin by discussing the anatomy of the spine. The spine is made up of multiple individual bones called vertebrae that provide support for the weight of the upper body and provide protection for the spinal cord by surrounding it with an armor of bone from the skull all the way down to the pelvis. Each vertebra can be described as a ring with the large cylindrical vertebral body forming the anterior aspect of the ring and the laminae and spinous processes forming the posterior aspect of the ring. The vertebral bodies are aligned with one atop another forming a column providing the majority of the support for the spine. The laminae form a shield protecting the posterior aspect of the spinal cord. It is important to note that the region of the vertebrae where the posterior aspects join with the anterior aspects is called the pars interarticularis. Also there are joints where the posterior elements of each vertebra come together above and below, and these are called facets. Finally, we must understand that the spinal cord branches into nerve roots at each intervertebral level and that these nerve branches exit the spine through channels called foramen that run beneath the facets.

Now that we've covered the pertinent anatomy, let’s discuss the various pathologies that you might encounter when researching a spinal injury. Of course, as mentioned earlier, disc herniations and spinal fractures are the most common injuries you will come across, but there are other conditions you will see from time to time. Spondylolisthesis, sometimes referred to as anterolisthesis, is a defect in the alignment of the vertebral bodies allowing one vertebral body to slip forward over the vertebral body at the level beneath. In most cases the entire spine, above the level of the defect, is displaced anteriorly. In other words, if you have a spondylolisthesis at L5-S1, the L5 vertebral body will be displaced forward in relation to the sacrum (S1) but L5 will still maintain its proper alignment with L4 and the other vertebrae above. While it may be easy to imagine this change in relationship between the vertebral bodies, it is more difficult to visualize the changes in the posterior aspect of the spine that allow this displacement to occur. In order for the vertebra to move forward the posterior articulations at the facets must be either dislocated or weakened, or there must be a separation in the pars interarticularis (another condition called spondylolysis) allowing for a separation of the vertebra itself. While such a defect in the pars is generally a congenital or pre-existing condition, trauma can cause a worsening of the actual displacement resulting in the spondylolisthesis that is eventually diagnosed. Spondylolishesis is a problem because it can change the passageway for the spinal cord down through the spinal canal causing compression or stretching of the spinal nerves. It can also place tension of the exiting nerve roots at the specific level of displacement or may be associated with a disc herniation at the level of instability. Spondylolisthesis can be mild to severe and if symptomatic is generally treated with a spinal fusion procedure including bone grafts and fusion hardware.

The final pathology we will discuss is spondylosis (sometimes referred to as ankylosis). Basically, this is simply arthritis of the spine. This arthritis may develop over time following the trauma involved in a case, or it may be preexisting and exacerbated by the injury of your case. As with all forms of arthritis, spondylosis primarily affects the joint surfaces. This can include the endplates of the vertebral bodies adjacent to the discs in the anterior aspect of the spine, or the articular surfaces of the facet joints in the posterior aspect of the spine. As with other forms of arthritis, this condition can cause localized pain within the joints themselves or can cause overgrowths of bone (bone spurs or osteophytes) that can protrude into vital regions causing compressions of vulnerable nerves including the spinal cord and nerve roots. As we learned earlier, the foramen through which the nerve roots travel are adjacent to the facets, so overgrowth of arthritis in this area can narrow these foramen and impinge upon the nerve roots. Spondylosis can be treated with a variety of procedures ranging from simple steroid injections to widespread spinal fusion surgery, based on the severity of the condition. The key issue is to remember that although this is an arthritic condition, it can be still linked specifically to trauma.

Monday, October 5, 2009

Classification of Burns


How do you classify burn injuries? At one time, this was a fairly simple question to answer, but the classification of burns is changing and a new system is gradually being adopted. This has made conversations about burns more complicated since you need to be sure that everyone concerned is using the same system and terms. This article will cover the basics and discuss terminology that you might face when handling your next burn injury case.

Traditionally, burns have been categorized as first-, second-, or
third-degree. This system is defined by the following categories:

• First-degree burns affect only the epidermis, or outer layer of
skin. The burn site is red, painful, dry, and with no blisters. Mild sunburn is an example.

• Second-degree burns involve the epidermis and part of the dermis layer of skin. The burn site appears red, blistered, and may be swollen and painful.

• Third-degree burns may also damage the underlying bones, muscles, and tendons. The burn site appears white or charred. There is no sensation in the area since the nerve endings are destroyed.

For many years, healthcare providers have also added a fourth-degree category. Using this system, third-degree burns are limited to those that extend down through the epidermis and dermis into the subcutaneous tissue, and fourth-degree describes the burns that extend down into the underlying muscles, tendons and ligaments.

Recently, a new system has come into use. This new system completely abandons the old use of degrees and describes the injuries based specifically by the depth of the burn. The traditional classification of burns is being replaced by the designations of superficial, superficial partial thickness, deep partial thickness and full thickness. Of course, these designations refer to the depth of the skin affected by the burn.

For now, the change in systems is still in progress, so during the transition you will notice a blend of terminology. Some experts may refer to first-degree, second-degree, third-degree and full thickness burns. Some may use a combination of terms such as first-degree/superficial, second-degree/partial thickness, third-degree/deep partial thickness and fourth-degree/full thickness. The variations can become confusing, so it is good to be versed in all the terms and systems discussed above.

Monday, August 31, 2009

Variations in Fetal Orientation During Pregnancy


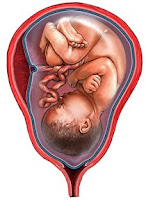
Obstetrics litigation often boils down to a question of what events occurred within the uterus during development or during the birthing process. Often, if we are to understand what happened to the fetus at a crucial moment in the pregnancy, we need to have a clear understanding of how that fetus is positioned within the uterus or the birth canal. For this reason, issues of fetal lie, presentation, position or station are eventually discussed in almost all obstetrics cases. Therefore, I will try to provide you with a basic understanding of these concepts so that you can better visualize the wide variety of ways that the baby can be positioned within the mother.

First of all we have to establish our terms. For the purposes of this conversation, I’d like for you to visualize the mother in a standing position so that “down” is toward her feet and “up” is toward her head. “Posterior” is toward her back and “anterior” is toward her front. Right will always mean her right regardless of how the baby is positioned or how you are standing. Just remember that when I use directional terms, it’s all about the mother.

Keep in mind that it is of paramount importance to know the orientation of the fetus within the uterus, particularly at the onset of labor. Orientations that are not ideal may require intervention and, in some situations, cesarean delivery may be the only viable option. During labor, an appreciation of the fetal station within the birth canal can help us to judge how the labor is progressing and which delivery techniques may be warranted at a given time.

Traditionally, the orientation of the fetus is described with respect to its lie, presentation and position. I will provide an overview of these terms. The lie of the fetus can be either longitudinal or transverse. In other words, the long axis of the fetus can either be parallel or perpendicular to the long axis of the mother. Luckily, the fetal lie is longitudinal in about 99% of cases. This is a good thing since a transverse lie cannot allow for the proper vaginal delivery of the fetus.

Once we know the lie, we can determine the presentation. The presentation can be either cephalic or breech, which means that the fetus can be either “head-down” or not. There are a number of different types of cephalic presentation, but the most common is called vertex presentation which refers to the fetus entering the birth canal head first with the upper occipital (back) portion of the head leading the way.

Next, the position of the fetus can be established. Position refers to the relation of the occiput (back of the skull) of the fetus to the left, right, front and back of the mother. In other words, if we know that the back of the fetal head is facing the front of the mother, this is called the occiput anterior (OA) position and if the occiput is facing the right side of the mother, this is called the right occiput transverse (ROT) position. Any combination of these, where the occiput of the fetus is toward the right and toward the front in a diagonal fashion, is called the right occiput anterior (ROA) position. This convention allows us to note any one of the following eight positions: occiput anterior (OA), right occiput anterior (ROA), right occiput transverse (ROT), occiput posterior (OP), left occiput posterior (LOP), left occiput transverse (LOT), and left occiput anterior (LOA).

Finally, we can discuss fetal station. The fetal station is a measurement of how far the fetus has progressed down through the birth canal during delivery. This measurement reflects the relationship of the leading edge of the fetus, generally the top of the head, to the ischial spines of the mother’s pelvis that are halfway between the pelvic inlet and pelvic outlet. When the leading edge of the fetus reaches the ischial spines, this is called zero (0) station. In the currently used “fifths” system the space is divided above and below 0 station in one centimeter increments, so that the space above the ischial spines is designated from -5 station to 0 station and the space below the ischial spines is designated from 0 station down to +5 station. With each centimeter that the leading edge of the fetus progresses, you reach a new station of presentation (-5, -4, -3, -2, -1, 0, +1, +2, +3, +4, +5).

You should be aware that a previously widespread system, the “thirds” system, divided the space above and below the ischial spines into arbitrary thirds so that the stations progressed from -3 to +3 without regard to actual centimeter measurements. This is important because only 0 station coincides in these two systems and you can get an inaccurate picture of the case facts if the correct system is not used. To complicate matters, many doctors and hospitals still refer to the old system so it is best to establish early which system is being used in the records of any particular case.

These are the key terms that you will encounter when researching almost any case involving birth injuries or obstetrics mal practice. Hopefully this overview has given you a better understanding of the varieties of fetal orientation and will help you to better visualize the lie, presentation and position of the fetus within the womb.